How to Create Your Own Server at Home for Web Hosting
No matter you are doing online business or offline business. The thing is, business is happening ONLINE. A website will give you more exposure, visibility, and conversions. As you know, you can find hundreds of reputed web hosting companies and local web hosting companies online.
But not interested in handing over your personal data to them?
No worries. If you have time, money, and patience, you can create your own server at home for web hosting! In this guide, we will talk about it.
Why Host Website on Own Server?
Before moving forward with the process, let’s learn why we (or you) need a custom server. There are so many occasions you need a private server for your website. The main reason we can find online now are:
- Security
- Privacy
- Pricing
- Scalability
Let’s take a look at each element.
1. Security
A few months back, a well-known web hosting company’s Windows server got hacked. It took them several days to recover from the attack. Sadly, all the customer’s websites are offline these days.
When running an online shop or something similar, you probably know that a one-second delay in loading can affect the entire business’s revenue. So, security is crucial in any online business.
If you have your own server at home, you can keep your files away from regular attacks.
2. Privacy
When you register with a web hosting company, you give your personal details such as name, address, phone number, email address, credit card details, etc. Well, most reputed hosting companies won’t misuse this personal information.
Create your own private server if you do not need to publicize your personal data. This way, you and only you use the service and don’t need to worry about compromising your privacy.
The fact is that some local web hosting companies can sell your personal data to third-party buyers. This can lead to spam email boxes and unwanted phone calls (mainly promotions).
3. Pricing
There are no web hosting companies offering services for a one-time fee. If there are, they might not be suitable for business or just scams. Pricing holds a vital role when it comes to website creation and management.
Most website hosting companies will charge you a recurring fee for using their services. This can be a monthly fee or a yearly fee. In our case, we are using Cloudways for our website and paying them monthly.
So, if you do not want to pay monthly rent for your server, hosting your own server at home is a wise choice. You can skip the payments and invest them in your infrastructure.
4. Scalability
When you choose web hosting companies, they will give you X storage space in the plans. However, if you need more storage space, upgrade the plan, which will cost you more.
When you have your own server at home, you can easily upgrade the RAM, storage, and everything related. That will give you complete control over your server. But, of course, upgrading will be a cakewalk when your business performs well and needs more power.
How to Create Your Own Server at Home for Web Hosting
Now you know the importance of your own server. This section will show you how to create your own server at home for web hosting. To make your own server, you will need several things.
- A Dedicated Computer
- Operating System
- Internet Connection
- Domain name
It can be a little tricky but keep up.
1. A Dedicated Computer

You can pick a PC according to your choice. However, using a computer, you use regularly is not recommended. Instead, you need to assign a dedicated PC to host your website. And that PC will serve your website files, nothing else.
You can start with a basic system and upgrade later. However, if you know what you are doing, invest in a medium-range PC. When you do that, you do not need to upgrade the storage or RAM later.
Intel or AMD processors will do the job. Having a decent processor always helps. If you are serious about your business, invest in i5 or Ryzen. That will be totally up to you.
When it comes to RAM, 8GB is enough. If you prefer more than enough, go for 16GB. According to your motherboard model, you can choose the RAM’s DDR3 variant/DDR4 variant.
You need a storage device to store the data. Unfortunately, HDDs are outdated and slow. To experience a faster page load, you must look into SSDs. SSDs (Solid State Drives) are the new storage devices with better read/write speed.
You can find SSDs with 60GB of disk space if you check the market. If you are not planning on adding more media to the website, 60GB is enough. On the other hand, if you plan to develop a content blog, go for 256GB or 512 GB.
You will need a CD Drive to install the operating system. You can skip the CD Drive part if you have a bootable Pendrive with the OS. Any of the USB ports will do the job.
Finally, invest in a good PSU (Power Supply Unit). Your server will be running 24*7. So, instead of local 450watts SMPS, go for gold-rated PSUs. So many companies like Corsair or Cooler Master develop the best PSUs with a whopping 10 years warranty. You can choose one according to your power requirements.
A GPU (Graphics Processing Unit) is not mandatory in the server. Graphics cards are used for gaming, video editing, or cryptocurrency mining; we do not need to invest in them. But a graphics card can be used if you are not interested in integrated graphics and require a dedicated display.
Now, you have a system dedicated to hosting your website. Next, let’s move to the following requirement.
2. Operating System

We can’t do anything without an operating system. Windows and Linux are two popular operating systems, and most people know them. Well, there is still premium, free, and freemium OS available, like:
If you want to set up a server at home, Linux can be your best choice. But first, you can pick an OS according to your requirements. And once you have done that, choose the version of the OS.
It can be 32bit or 64bit.
Now, download the ISO version of the OS, and install it on your PC. If you have a bootable Pendrive, you can use Etcher to install the OS on the Pendrive. You can plug this Pendrive into the USB port and boot it from there.
3. Internet Connection

An internet connection is essential. That’s how you and your website visitors can access the website files. You need to invest in good ethernet cables and routers. Your router will be running 24*7 without any breaks.
On top of that, you need to use a reliable internet service provider. If the internet is down for a while, your website will be offline too. So, when choosing an internet connection, keep these in mind.
Domain Name

Once you have created a server, installed OS, and connected to the internet, you can access it using the IP address. It can be anything like 128.0.2.1 or something similar. But, it is not friendly.
A domain name can be convenient in this case. Purchasing a domain name is simple. This is because many domain name registrars like Google Domains, Namecheap, Namesilo, GoDaddy, Domain.com, etc. You can use any of them to purchase a domain name.
In our case, we recommend Namecheap. You can always use our unique Namecheap coupon code for a discount. After purchasing the domain, you can link it with your server.
So instead of the IP address, you and your website visitors can type in the domain name and visit the website as usual.
Setting Up the Web Server Tutorial
We will be using a Windows server as the operating system. The main advantage of Windows over Linux is the easy-to-use interface and features.
You can use any server OS like 2012, 2016, or 2019. All of them work similarly, and you can’t go wrong.
This section will show you how to turn your standard Windows server into a complete web server.
Step 1: Server Manager
Once you have booted up the system, you must open the server manager. From the left-hand bottom corner, you can see it.

Step 2: Add Roles and Services
Once you have opened the server manager, you must open the Add Roles and Services section from the Manage section.

Step 3: Start the Process
You have to start the process by clicking Next.

Step 4: Choose the Installation Type
Choose the first option from the installation type section.

Step 5: Select the Server
From the server selection wizard, you need to choose the server.

Step 6: Add Role
Next, you need to add the web server role to the computer.

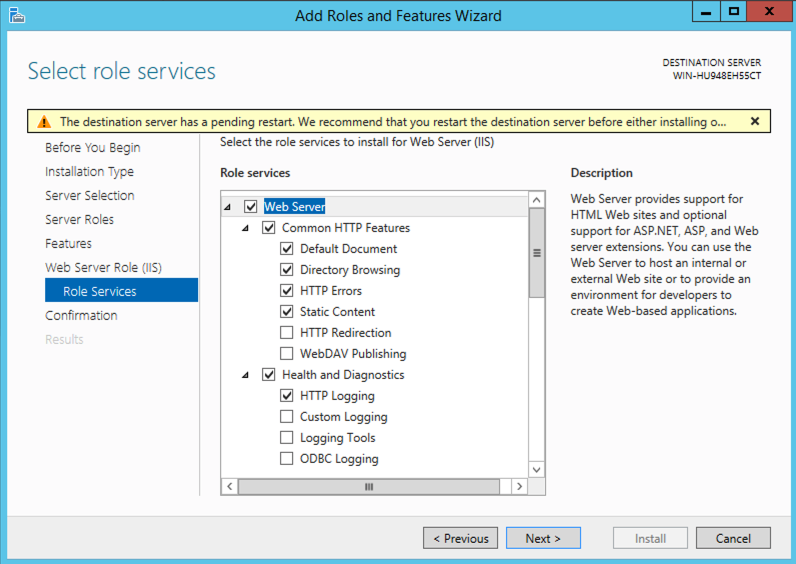
Step 7: Customize the Web Server Role
From the next page, you can customize the web server role.
Step 8: Complete the Installation
You can complete the installation at last.

Step 9: Managing the Web Server
You must open the IIS manager if you need to manage the server.

Now to access the website, you can enter the public IP address. However, entering the shared IP whenever you need to access the website is inconvenient.
That’s where domains come in handy.
By pointing the IP address to A record of your domain name, you are finally good to go. Contact the support team if you have issues configuring the domain name. They will help you to set up the A record.
That’s it. This way, you can set up a web server.
What Are the Disadvantages?
Well, as you can see above, running a server at home can be really fun and challenging at the same time. But there are some disadvantages. So in this section, we will show you a couple of the penalties you need to consider.
1) Power Failure

Since we use our home electricity to power the server, we need an uninterrupted power supply. Unfortunately, in India, power cuts are expected. So, you need to prepare for them accordingly.
For example, an industrial-grade inverter or something similar for backup can be a good option. But invest in the inverter if you are really serious about the business.
These things can cost you a good amount of money. So, plan according to the power failure and fluctuations.
2) Upgrading
You are using a physical HDD/SSD for storing the data. And you will be manually taking care of it. So, for example, over time, the unit can get corrupted.
Another thing is if you have exhausted all the storage space available in your SSD, that’s another thing.
Manually upgrading will take some time. You can’t do it on a live machine. So, turning off the device will make your website unavailable.
Think about that.
3) LAN Threats
We can’t use a web server without connecting to the internet. So, it is pretty much exposed. There will be security threats. Someone with your IP address can access your files and claim whatever they need.
So, buckle up for some extra security.
4) Environmental Issues

If you live in an industrial area where wood works, there will be a ton of dust. With filters and covers, you can protect your computer server. But that’s not enough.
Dust can be a really challenging task for you. So, make sure that your server is in a secure place.
So that’s it for this article, and that’s how you can create your own server at home.
Conclusion
Creating your own server at home can be entertaining and challenging at the same time. This is the right choice if you do not need to spend money on third-party web hosting providers.
Create your own home server if you have enough time and money to spare. We hope you have found this article interesting and learned something new today. Please consider sharing this article with your friends and fellow bloggers on social media if you do.
For more articles, check out our blog.
About the Author
Did you find the article useful?
Then pin me to your Pinterest Board, so that more people will find me
(Remember: The more you give to the Universe, the more you will get from the Universe)
So, Pin meEnter your Email Address below and be the FIRST to receive our Blogging Tips.


![How to purchase a namecheap hosting package? [tutorial]](https://blogheist.com/wp-content/uploads/2016/06/how-to-purchase-hosting-package-at-namecheap.jpg "How to purchase hosting package at namecheap")

Leave a Reply
You must be logged in to post a comment.