How to Create a WooCommerce Store Within a Day: A Step by Step Guide
eCommerce is a booming industry trend that isn’t slow down soon. With more and more brick-and-mortar stores going online, customers can order online from the comfort of their homes.
Do you want to create an online store? Want to take your existing offline store online? Want to create a WooCommerce store in a day?
Creating an online store is easier than you might think. Follow this guide, and you’ll be up and running soon!
Ready to create a WooCommerce store within a day?
Set your timer, and let’s begin!
What is WooCommerce? And Why WooCommerce?
WooCommerce is an innovative open-source solution used to create online stores in WordPress. Using the WooCommerce plugin, you can convert a simple WordPress website into a full-fledged online store in minutes.

WooCommerce allows you to sell physical and digital products, manage inventory, track orders, set up payments and shipping, and much more.
The best part is that WooCommerce is beginner-friendly, and you can get started with your online store for free. Well, your only investment is for the domain, hosting, and some premium plugins if needed. But, aside from that, it’s all free!
Here are a few stats that’ll underline the popularity of WooCommerce:
- There are 4,414,537 websites currently using WooCommerce
- Nearly 7.5% of all websites use WooCommerce
- WooCommerce powers 28.19% of all online stores
- With 68% usage, WooCommerce is the most popular eCommerce plugin
- The WordPress ecosystem has over 1,400 WooCommerce plugins
(Source: Hosting Tribunal)
The bottom line is that WooCommerce is the most popular option for creating an online store.
What Do You Need To Start an Online Store?
Here is a list of steps required to start an online store using WordPress and WooCommerce:
- Set up domain and hosting
- Install WordPress
- Install WooCommerce
- Install a theme and the essential plugins
- Set up tax and payments
- Set up shipping
- Add products
- Secure your store
- Track your sales
- Promote your online store
That’s it!
How to Create a WooCommerce Store?
Now let’s cut to the chase and walk you through creating your WooCommerce store.

Step 1: Set Up Domain and Hosting
Step one is to register a domain and hosting. There are several hosting options available. Some popular ones are Bluehost, HostGator, SiteGround, and GreenGeeks.
Check out our 8 best WordPress hosting providers list for more options.
While narrowing down on your hosting options, look for one that is reliable, offers at least 99.9% uptime, is secure, loads fast offer, CDN, and, most importantly, supports WordPress and WooCommerce.
Step 2: Install WordPress
Once you’ve purchased your WordPress hosting, you’ll be walked through some easy-to-follow steps to create your website.
We’ll use Bluehost for our example, as it’s one of the hosts we recommend.

Log into your Bluehost account, answer a few simple questions related to your website, and you’ll be on your Bluehost dashboard before you know it.
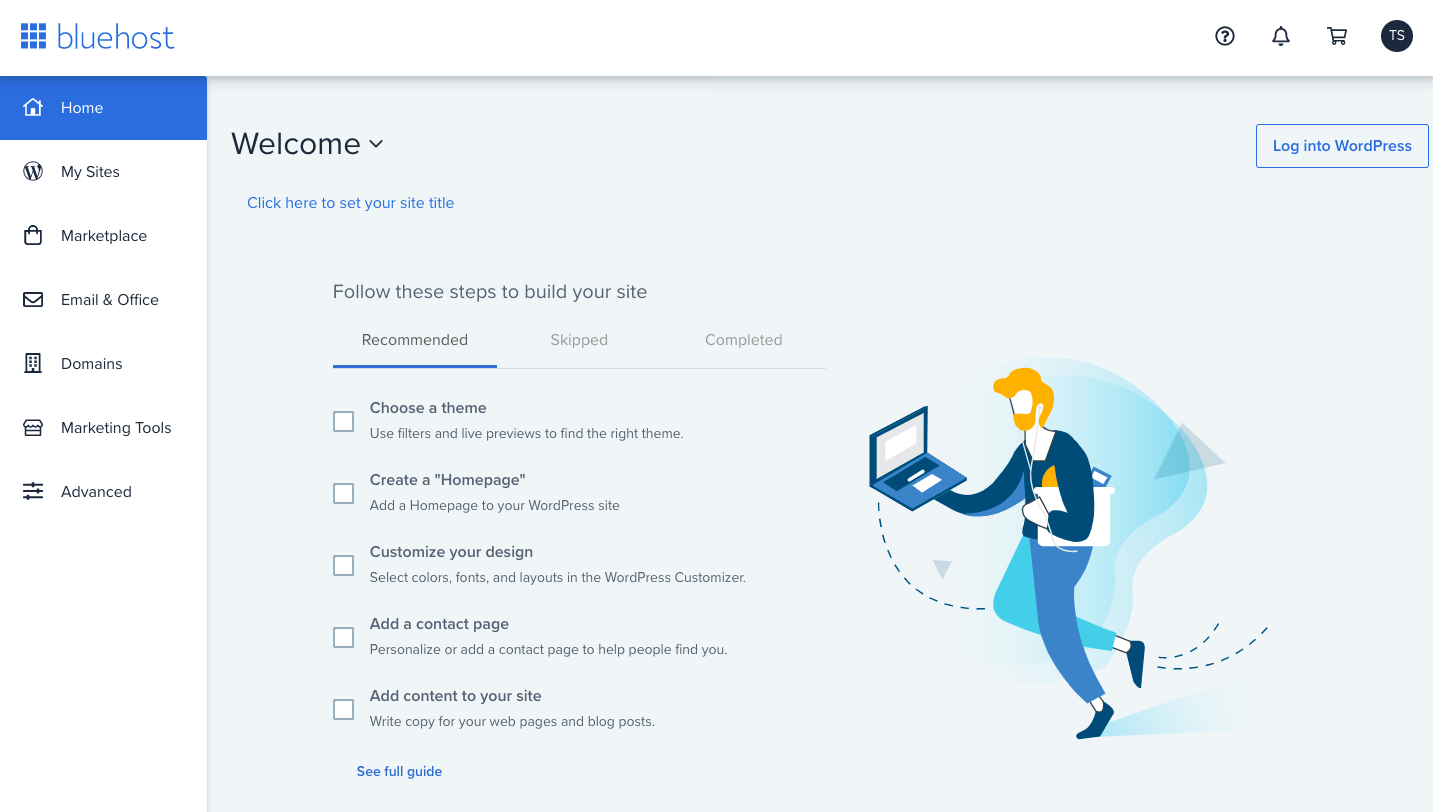
From your Bluehost dashboard, you’ll find an option to log into your WordPress dashboard.
Click on the button and jump onto your WordPress dashboard.

And that’s how easy it is to install WordPress!
Step 3: Install WooCommerce
Now that we have WordPress installed, we need to convert our website into an online store. For this, we need to install WooCommerce.
Select Plugins > Add New from your WordPress dashboard’s left-side menu.
Then search for WooCommerce.
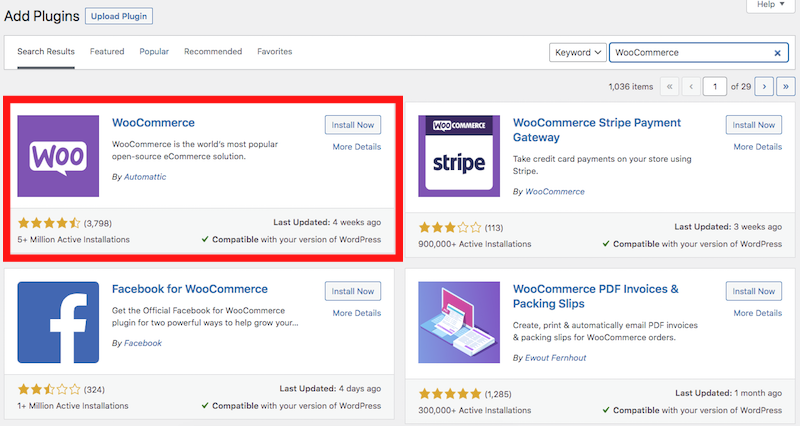
Click on Install Now and Activate.
Once the plugin is activated, you’ll be prompted to fill in some basic details. Details include your store address, the kind of products you’re selling, location, etc.
Once you’ve completed all the steps, you’ll be taken to the WooCommerce dashboard.
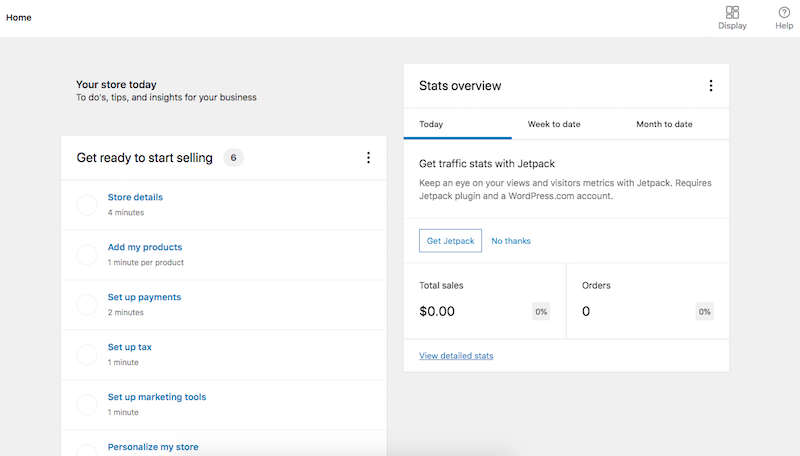
Your WooCommerce dashboard is pretty intuitive, with several metrics all in one place. In addition, there’s a lot of helpful information, from traffic insights to the total sales and orders.
You’ll also notice many new links on the left-hand side of your WordPress dashboard. Links such as Marketing, Products, and Analytics are all part of WooCommerce.
Step 4: Install a Theme and Essential Plugins
We’ve got ourselves a store address, a hosting service that supports WordPress, and then installed WordPress and WooCommerce.
In short, we’ve got our platform ready.
The next step is to make our store look great. After that, we’ve got to install a theme!
Select a theme that takes time to load and negatively impacts your website performance.
We recommend the Astra theme. Astra is a hugely popular WordPress theme that is lightweight and has been used on more than 1.6 million websites. Websites built using Astra load in under 0.5 seconds and are already optimized for conversions.
To install the Astra theme, head to Appearance > Themes > Add New and search for Astra.
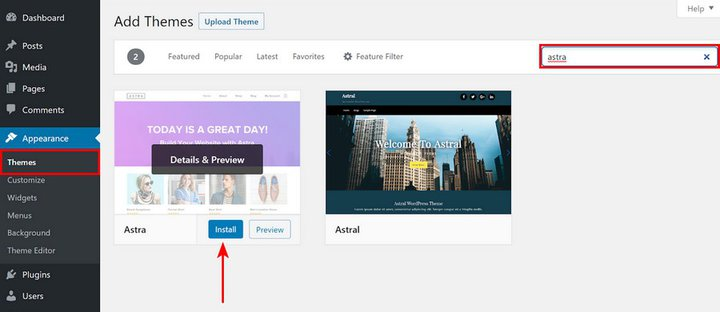
Once installed, it’s time to have a professional-looking website ready. And that’s what we love about the Astra theme. It’s pre-built Starter Templates.
Using the Starter Templates, you can import a complete website in just a few clicks.
Navigate to Appearance > Astra Options and click on Install Importer Plugin.
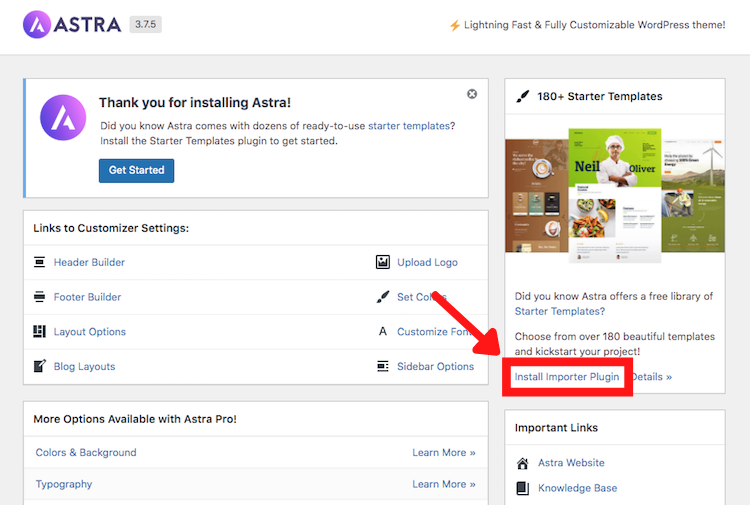
Select a page builder from the options provided to proceed.
A page builder is like an editor. It helps you create, edit and manage your pages and posts. Some of the popular ones are Elementor, Beaver Builder, and Brizy. Gutenberg is the default block editor that comes when you install WordPress.
You’ll now be presented with various website templates for your preferred page builder.
Look for an online store theme in the search field.
You can filter the options based on free and premium themes. We’ll stick to the free ones for now.
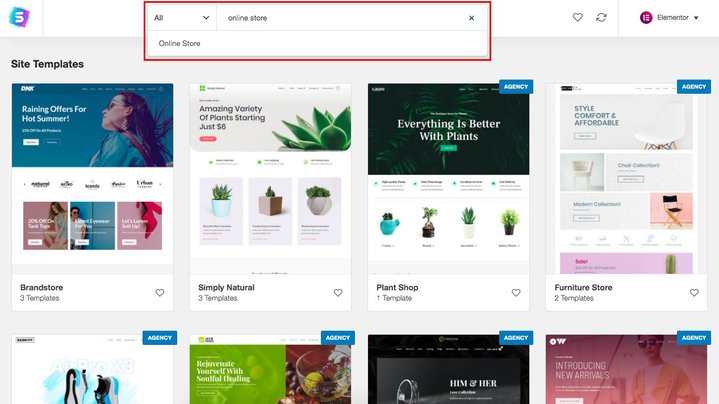
The premium themes come with the Astra Agency bundle.
Select a template and complete the import process.
For instance, we’ve selected the Organic Store.
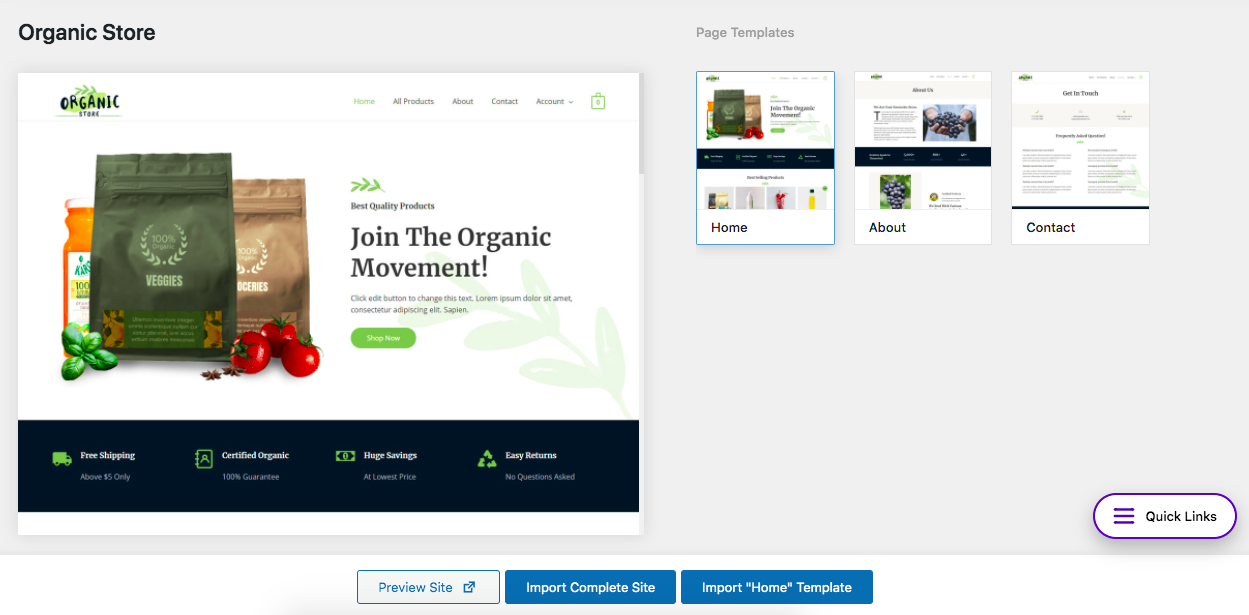
You can preview the site, import the complete site, or import any of the templates.
We’ll go with Import Complete Site.
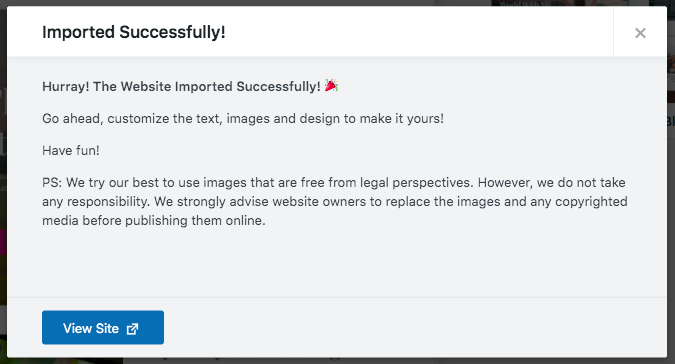
Once the import has been completed successfully, you’ll have a professional-looking online store site up and running!

Didn’t we say this was easy?
All you have to do now is complete a few WooCommerce settings, add your products, and set up payments and shipping.
Head over to WooCommerce > Dashboard.
The Get ready to start selling section indicates a bunch of to-dos you’ve got to complete.
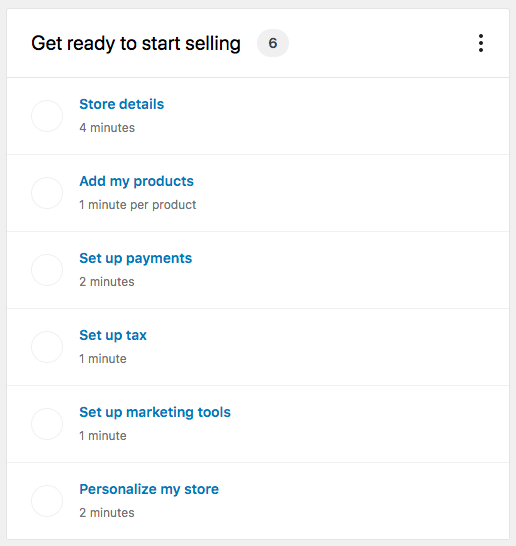
This includes your store details, adding products, setting up payments, and more.
It’s all pretty straightforward. It even indicates how long each of the steps would take you.
For instance, click on Set up payments which should take about 2 minutes to complete.
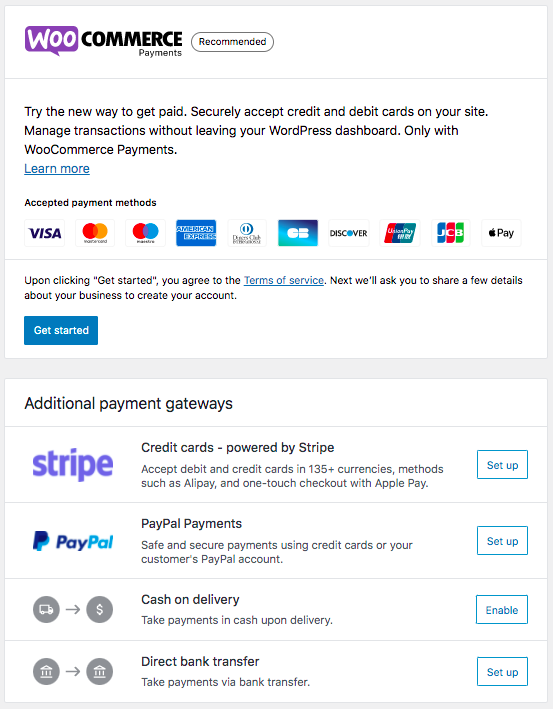
Click on Get Start and complete the relatively straightforward steps to set up payment methods. Want more payment options? Select from the additional payment gateway options.
These settings can also be accessed via WooCommerce > Settings.
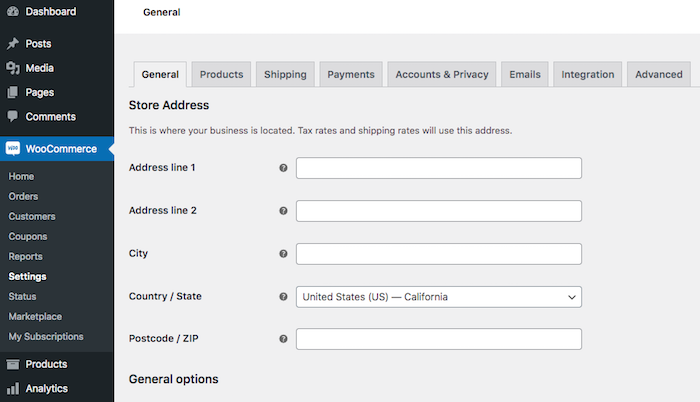
Once you are done with all the above settings, let’s move on to a few additional specifics.
Step 5: Set up Payments and Taxes
Any online store needs to accept payments. And if you’ve completed the above setup process, you’d have found that WooCommerce makes this relatively simple.
Some of the default payment options that WooCommerce offers are direct bank transfer, cheque payment, and cash on delivery.
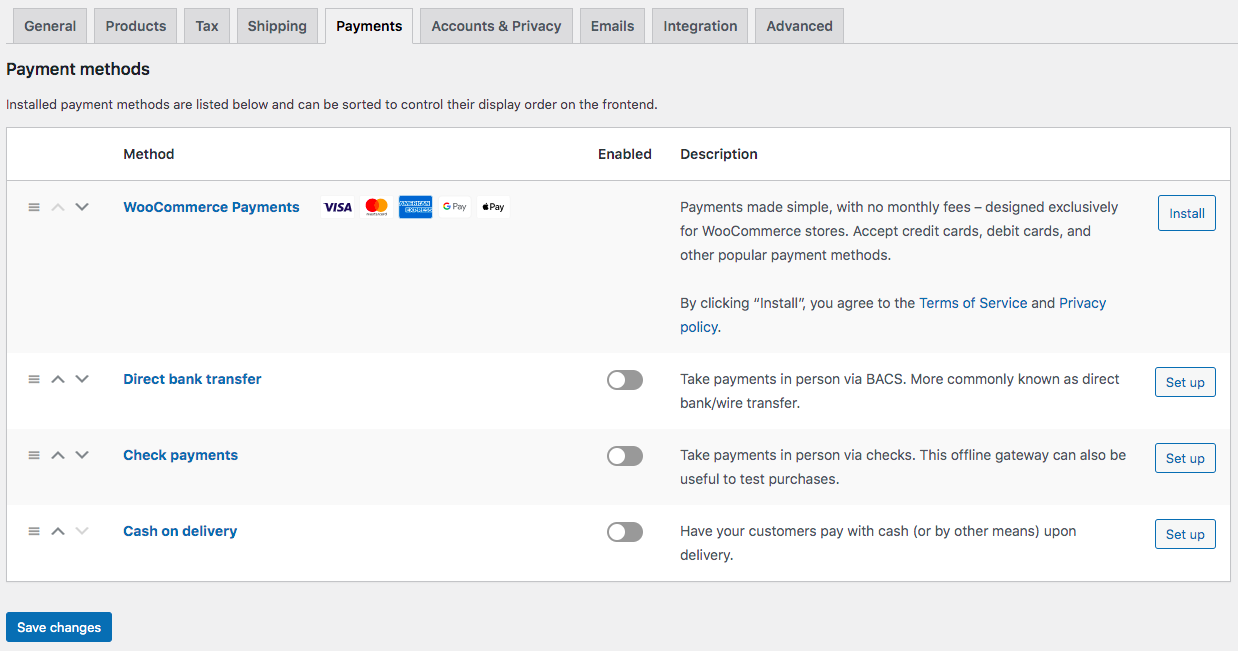
You can also install the WooCommerce Payments plugin to accept payments via credit cards and other popular payment methods.
Want to include additional payment options such as PayPal and Stripe? No problem!

Follow the easy setup process and add your favorite payment gateway.
You may also want to add taxes. In some cases, taxes are disabled by default.
To enable taxes, head over to WooCommerce > Settings > General.

And then ensure the ‘Enable tax rates and calculations’ box is checked. Finally, click Save changes when you are done.
You’ll then find the Tax tab under WooCommerce settings.
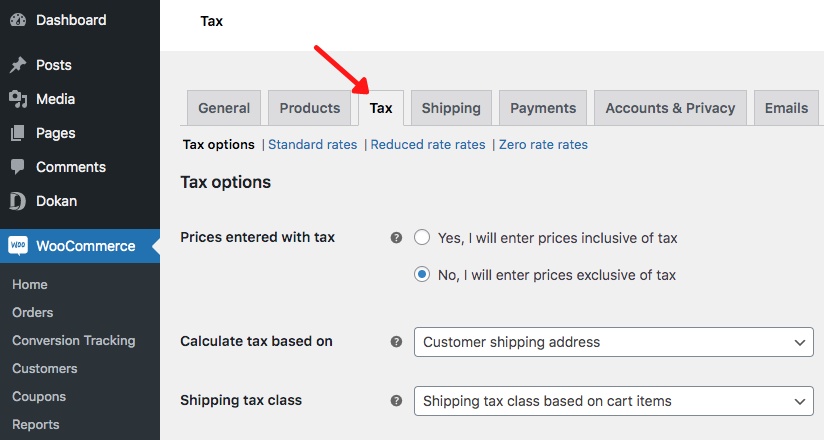
Now you can include the appropriate tax components for your region.
Step 6: Set up Shipping
WooCommerce provides you with several options when it comes to adding shipping. If the default options aren’t enough, you can always integrate with third-party services that manage shipping and delivery.
The default options WooCommerce provides are flat rate, free shipping, and local pickup.
To set these up, head to WooCommerce > Settings and click on the Shipping tab.
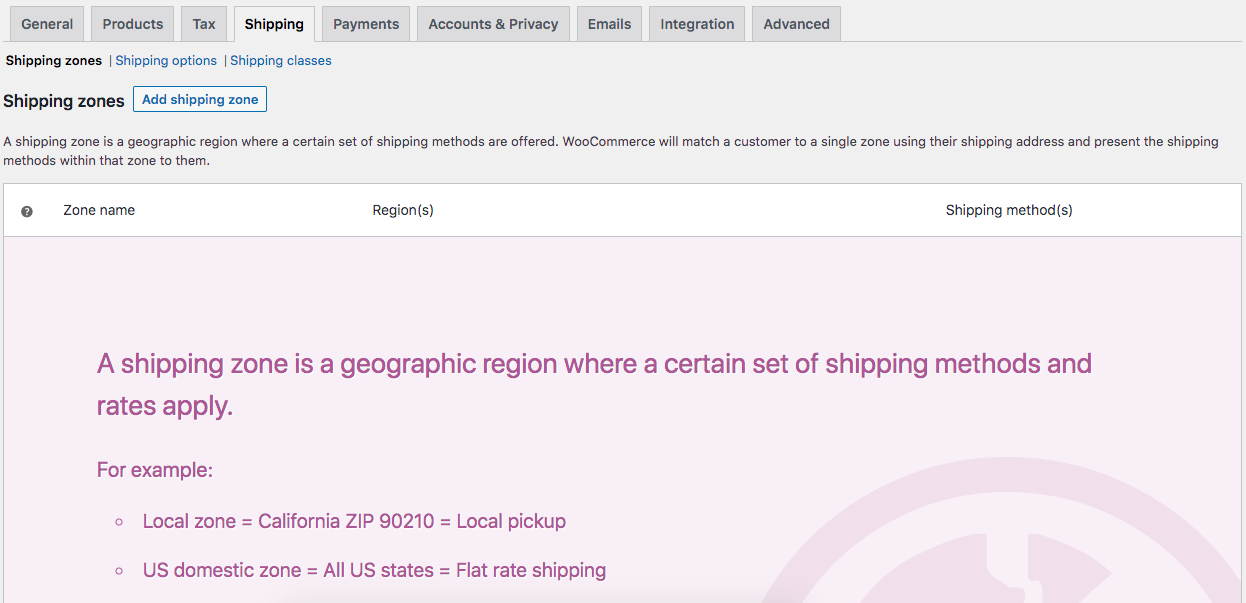
Then click on Add shipping zone.
You can opt for one of the default shipping methods.
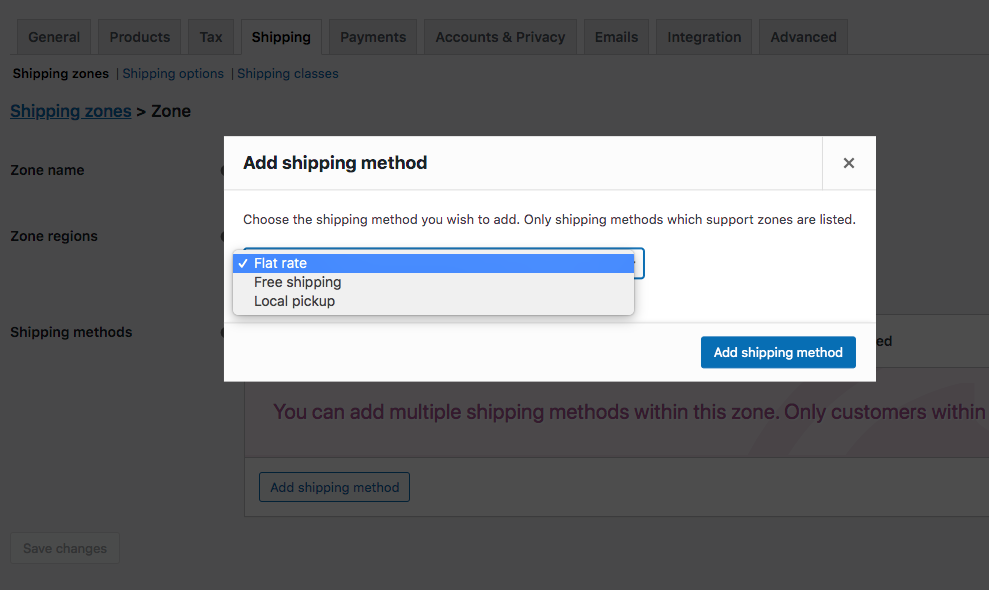
If you want to add alternative shipping methods, there are always WooCommerce shipping extensions that you can use.
You can add shipping methods such as table rate shipping, third-party carrier rates in real-time, and more.
Once you’ve added a zone and the shipping method, you can assign the shipping cost and the associated taxes.
For that, hover over the shipping method you created and click Edit. You’ll be presented with a popup with some options based on your shipping method.
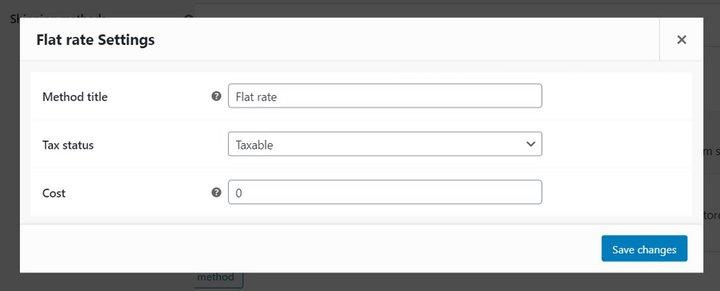
Check with your shipping partners and add the cost accordingly.
Step 7: Add Products
Now that we have all the settings, it’s time to add some products to the store.
While adding products is relatively simple, we must plan our store structure and add relevant product categories.
You needn’t add any categories if your store deals in only one product. However, having several products in relevant categories makes sense if you’ve got several products.
For instance, if you’re running an online clothing store, you could have categories like kids, women, and men.
You could further classify them, such as everyday wear, sportswear, formal attire, etc.
Not only do categories make navigating your online store easier for customers, but it also helps when you want to run offers for a particular product category.
E.g., if you’d like to run a promotion for sportswear, you could direct your ads to a URL such as https://onlinestore.com/sportswear.
To add categories, head over to Products > Categories.
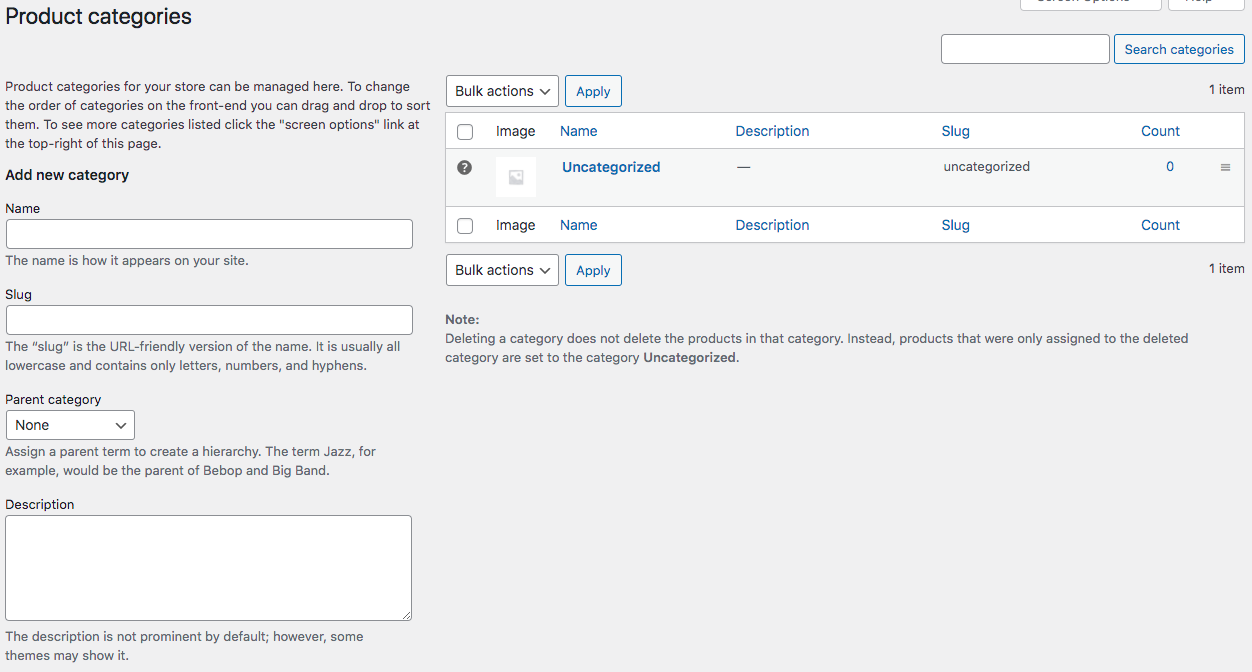
Enter your category name and click on Add new category.
You can repeat this process for all the categories you want to create.
Once you are done, head over to Products > Adds New.
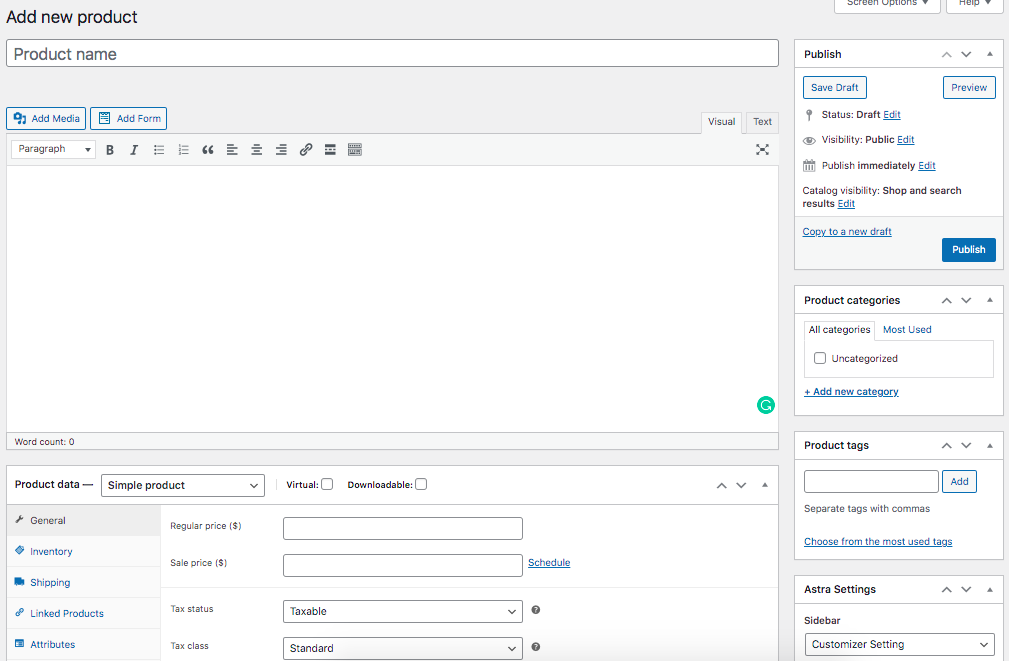
You can now add all the product details, such as the product name, description, and everything else you want to display.
As you scroll down, you’ll notice the product data section.
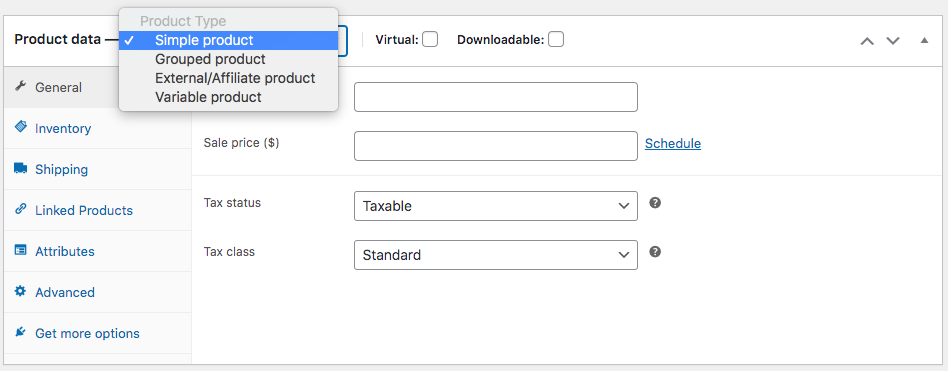
We recommend you play around and explore the various options available in this section.
Once you have included all the required details, click Publish.
Your products will appear on the store page of your website.
Step 8: Track Your Sales
Now that your online store is running with all the products included, we’ll want to track the sales and traffic. This way, we know what’s working and what’s not.
WooCommerce makes this easy with in-built analytics.
Navigate to Analytics > Overview.
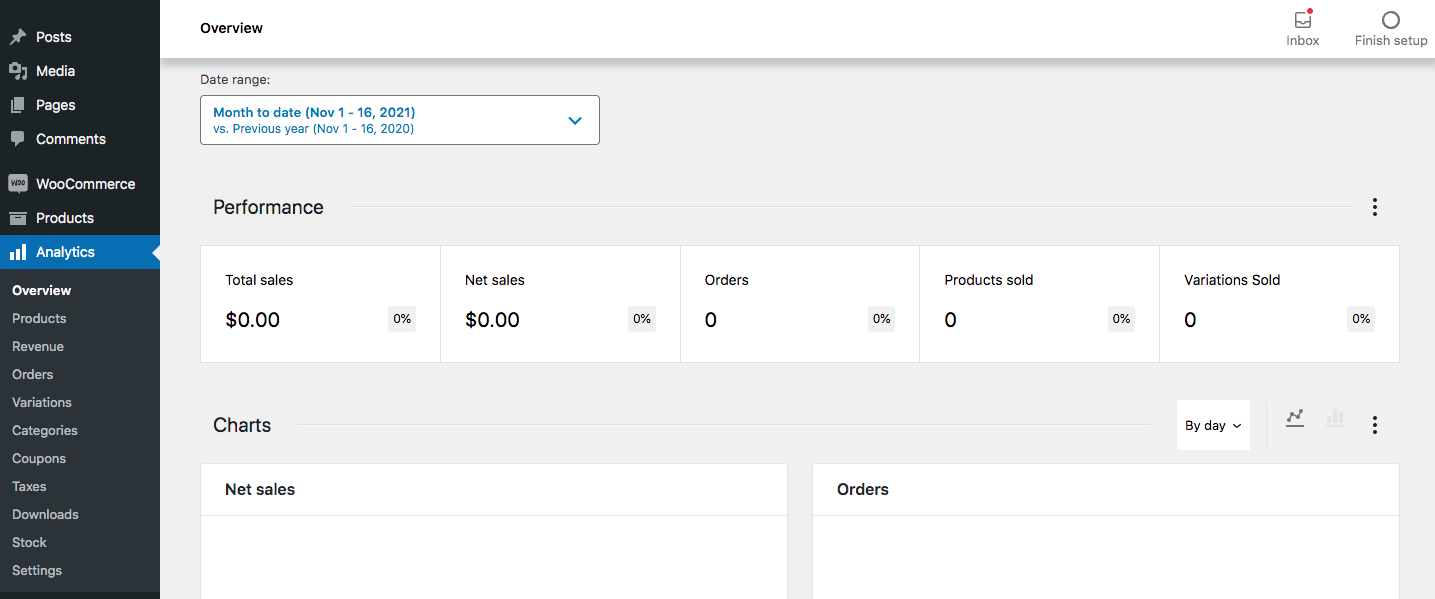
You’ve got a range of metrics to help you understand how well your store performs.
Which are the most popular products, total sales, revenue, coupons used, stock inventory, and more.
Step 9. Extend Your Online Store
Another significant advantage of using WooCommerce to create an online store is the number of free and paid WooCommerce extensions you can use.
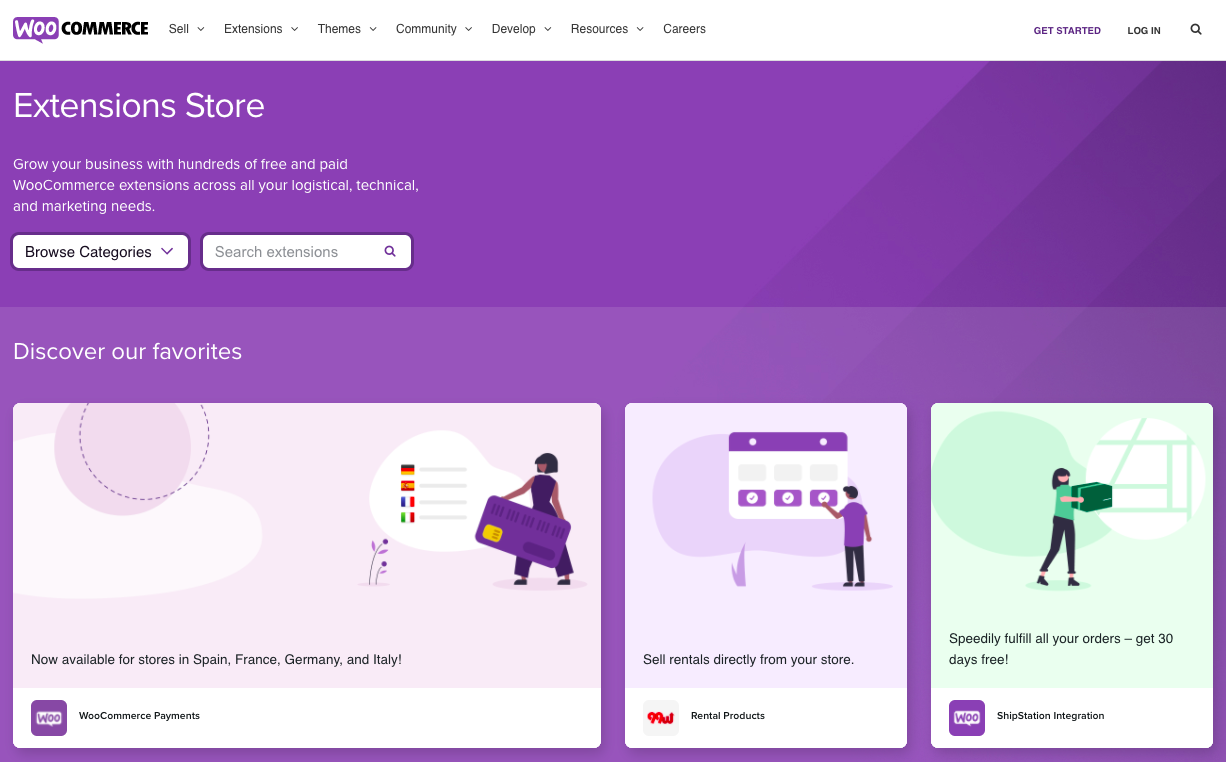
As we’ve seen, you can run a full-fledged online store without investing in anything besides the domain and hosting.
That said, you aren’t limited in extending your store’s functionality.
Some of those functions are available right within your WordPress dashboard.
Head over to Marketing > Overview.
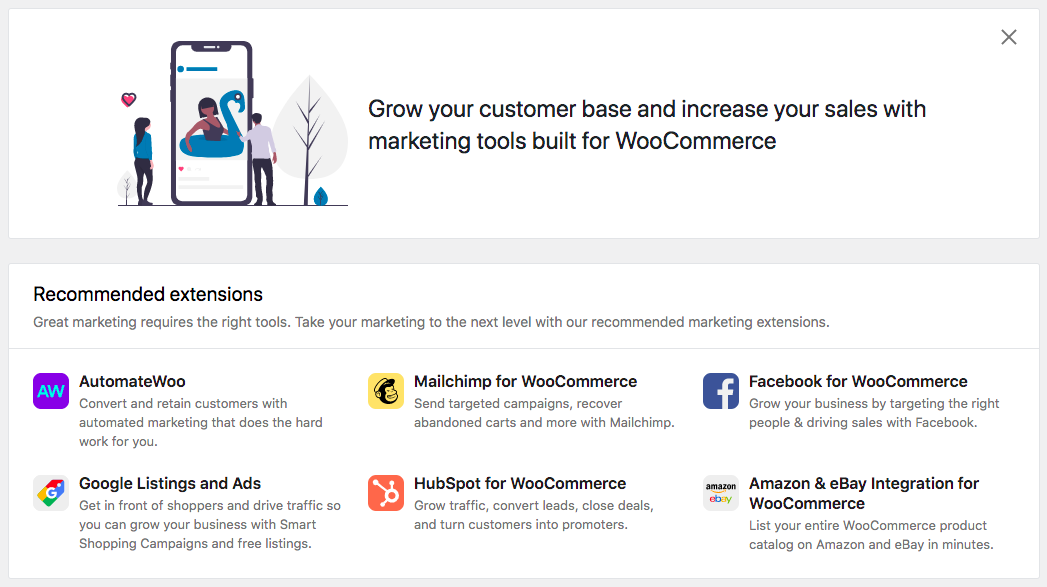
You can use some of the recommended extensions, such as Mailchimp, to build your email list or even Facebook for WooCommerce to showcase your store products on your Facebook shop page.
Want to display Google ads? No problem! Use the Google Listings and Ads extension for advertising your products on the Google platform.
Another method to bring more traffic to your store and generate sales is using coupons. You know those buy-one-get-one offers, discount coupons, and more.
WooCommerce makes this easy too!
Navigate to Coupons and create your first coupon.
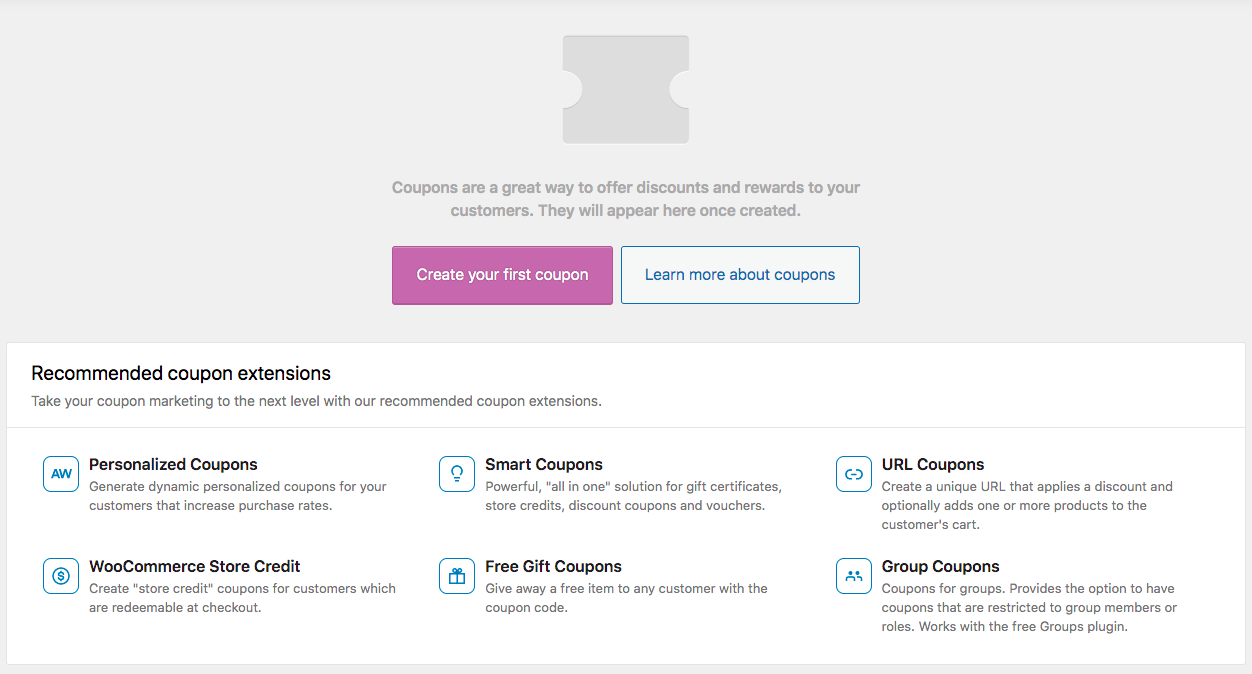
Additionally, some plugins that you can consider installing are:
- UpdraftPlus: Helps backup your entire site
- Wordfence Security: Add a layer of security for your online store
- W3 Total Cache: Speeds up your website and enhances user experience
- Yoast SEO: Rank higher on search engines by working on your site’s SEO
- WP Schema Pro: Add schema markup to your website and boost traffic by displaying rich snippets on search engines
- WPForms: Allow your site visitors to contact you
- Social Media Share Buttons: Let your customers spread the word by sharing your store and products on social media
- Cartflows: Sales Funnel Builder to Increase Conversions & Maximize Profits.
- Convert Pro: Email Opt-In & Lead Generation Plugin to Increase Subscribers & Conversions.
Bonus: Join the WooCommerce Community
WordPress and WooCommerce have a vast community that is always there to assist you.
While there may not be a dedicated support team, you will always find answers to your queries from the WooCommerce Community.

You can also refer WooCommerce documentation for any additional support.
Conclusion
Online sales are skyrocketing, and this trend is not slowing down shortly. Everyone is going online, from your local mom-and-pop stores to larger brick-and-mortar stores.
Fortunately, creating an online store with WooCommerce is relatively easy and doesn’t cost much. So you should be able to develop one relatively quickly just by following this guide.
Over to you. Were you able to create a WooCommerce store using the steps mentioned above? And if you still have your timer running, let us know how long it took you to create one!
Note: This tutorial to create a WooCommerce store was contributed by Sujay Pawar. Please check our guest post guidelines if you have a detailed tutorial on contributing.
About the Author

Did you find the article useful?
Then pin me to your Pinterest Board, so that more people will find me
(Remember: The more you give to the Universe, the more you will get from the Universe)
So, Pin meEnter your Email Address below and be the FIRST to receive our Blogging Tips.





Leave a Reply
You must be logged in to post a comment.